Charcoal Drawing: Texture, Depth, and Drama

by Steve Mason

Charcoal Drawing: Texture, Depth, and Drama

Charcoal is one of the oldest and most expressive drawing materials. From bold gestural sketches to finely controlled portraits, it captures mood and movement in a way few other mediums can.

As someone who’s used charcoal throughout my practice — from life drawing sessions to large studio works — I’ve learned that it’s all about control and mess in balance. Charcoal rewards freedom, but also discipline. This guide explains the different types, surfaces, and tools you’ll need to get the most out of this beautifully raw material.

Table of Contents

Understanding the Different Types of Charcoal
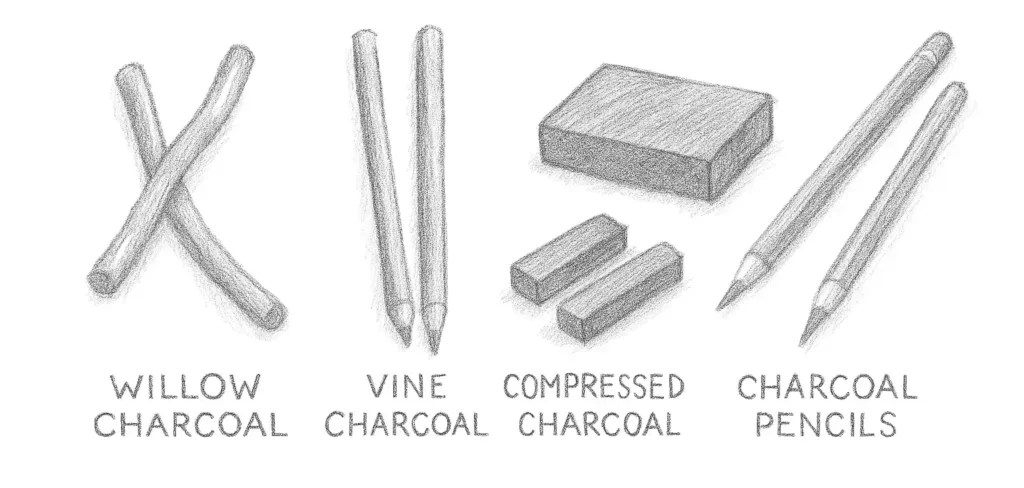
 

Vine Charcoal

Soft, powdery, and easy to erase — vine charcoal is ideal for initial sketches, gesture drawings, and tonal blocking. It produces light to mid-grey marks that can be effortlessly smudged or lifted for softer effects.

Recommended: Winsor & Newton Vine Charcoal Set – perfect for sketching and underdrawing work.
Why I like it: Gentle, expressive lines that encourage freedom and spontaneity.


Willow Charcoal

Slightly denser and smoother than vine, willow charcoal offers more tonal control while retaining that velvety softness. It’s made from slender willow branches slowly carbonised to preserve their natural grain, producing consistent, rich lines that blend beautifully.

Best for: Life drawing, portrait studies, and atmospheric sketches where subtle gradation matters.
Recommended: Derwent Willow Charcoal Sticks – Assorted Thicknesses – excellent range for varying mark size and tone.
Why I like it: Exceptionally responsive to pressure — light strokes create delicate grey tones, while firmer lines build deep, velvety blacks.


Compressed Charcoal

For bold contrast and deep blacks, compressed charcoal is the best choice. It’s made by binding powdered charcoal with a small amount of gum or wax, giving it greater durability and intensity. Perfect for high-contrast work, detailed shading, or adding punch to larger compositions.

Recommended: Conte à Paris Compressed Charcoal Sticks (Soft, Medium, Hard)
Why I like it: Great tonal range — from precise edges to rich, dark fills.


Charcoal Pencils

If you want the look of charcoal with the precision of a pencil, charcoal pencils are ideal. They produce fine, controlled lines without the mess of loose sticks and are perfect for outlines, details, or adding contrast in mixed-media drawings.

Recommended: General’s Charcoal Pencil Set (includes white charcoal and sharpener)
Why I like it: Excellent control, travel-friendly, and great for layering detail over vine or willow sketches.

Choosing the Right Paper


Charcoal needs a surface with a bit of tooth to grab the particles and hold layers. Smooth papers will cause smudging and streaks.

Best Paper Types:
  • Cartridge Paper (160gsm or higher): versatile and affordable.
  • Textured Paper: holds more pigment for dramatic contrast.
  • Toned Paper: adds mid-tones automatically, allowing highlights to pop.
Recommended:
  • Canson Mi-Teintes Touch Paper – textured surface for rich layering.
  • Daler-Rowney Fine Grain Cartridge Pad – excellent for studies and practice.
  • Strathmore 400 Series Toned Paper – ideal for white highlights and balanced values

Tools for Blending and Shaping


Blending Tools
  • Tortillons or Paper Stumps: smooth transitions and gradients.
  • Brushes or Cloth: for softer edges.
  • Fingers: organic blending, but keep tissues handy!


Recommended: Derwent Paper Stumps Set, Faber-Castell Blending Tortillons.


Erasers

Charcoal is as much about lifting as it is about laying down.

  • Kneaded Eraser: shapes into points for highlights.
  • Vinyl Eraser: for strong light areas.
  • Brush: gently clears dust without smudging.


Recommended: Faber-Castell Kneaded Eraser, Staedtler Mars Plastic Eraser.

Fixatives and Finishing


Charcoal can easily smudge, so fixatives are essential for preserving your work.

Best Fixatives:
  • Winsor & Newton Artists’ Fixative – reliable, fine mist for even coverage.
  • Daler-Rowney Perfix Colourless Fixative – minimal colour shift.
  • SpectraFix Degas Fixative (Odourless) – great for studio environments.


Tip: Spray in light, even layers at least 30cm away — and always test first on scrap paper.

Steve’s Recommended Starter Charcoal Kit


Type Product Why I Recommend It
Vine Charcoal Winsor & Newton Vine Charcoal Smooth tone, easy to erase
Compressed Sticks Derwent Charcoal Set Rich blacks, consistent texture
Charcoal Pencils Faber-Castell Pitt Set Control and clean handling
Paper Canson Mi-Teintes Touch Pad Ideal tooth and durability
Fixative Winsor & Newton Artists’ Fixative Long-term protection


Affiliate Note: These products are excellent starting points for anyone exploring expressive charcoal work.

Techniques for Expressive Results


Layering

Start light and build up tone gradually. Use vine charcoal first, then compressed charcoal for depth.

 Smudging and Blending

Use your stump or tissue to create atmospheric transitions — but avoid overworking, or tones become muddy.

 Highlights

Lift out light with a kneaded eraser for striking contrast and realism.

 Edge Control

Alternate soft and sharp edges to guide the viewer’s eye and create focus.

Keeping Things Clean


Charcoal is messy — but manageable.

  • Work over newspaper or a drawing board.
  • Use a fixative spray as you go.

Store finished pieces with tissue between sheets

Next Steps


Charcoal drawing builds your understanding of tone and value like nothing else. Once you’re comfortable, try combining it with graphite or white chalk for richer effects.


Explore my next articles:

  • Graphite Mastery – Control and Precision
  • Pastel Drawing – Colour, Texture, and Blend
  • Choosing the Best Drawing Papers for Artists

Conclusion


Charcoal is the artist’s medium of emotion — direct, raw, and endlessly versatile. It teaches sensitivity to tone and touch, while encouraging expressive freedom. Whether you’re sketching life models or dramatic landscapes, it rewards every mark you make.

Start with a few sticks, a toned sheet of paper, and the willingness to experiment — the rest will follow naturally.


Affiliate links help support this site at no extra cost to you. Thank you for using them.